Fingerstyle Ukulele for BeginnersSoprano, Concert and Tenor ukuleles
Lesson 1
Lesson 1 introduces the idea of finger style patterns, and presents some simple pattern styles.
Using two familiar songs, this lesson demonstrates how different patterns can be built upon to
create more complex and interesting patterns.
You Are My Sunshine is a tune most people know, and almost certainly have strummed as one of the first uke tunes to learn.
It's also a good place to start with finger style.
There are 3 versions here, each one a little more advanced than the last.
Oh Susanna, again fairly familiar to most people.There are 4 versions of this tune,
each one a little more advanced than the last.
- Oh Susanna 01.pdf
- Oh Susanna 01 Lyrics.pdf
- Oh Susanna 01 Slow.mp3
- Oh Susanna 02.mp3
- Oh Susanna 02.pdf
- Oh Susanna 02 Lyrics.pdf
- Oh Susanna 02 slow.mp3
- Oh Susanna 03.mp3
- Oh Susanna 03.pdf
- Oh Susanna 03 Lyrics.pdf
- Oh Susanna 03 slow.mp3
- Oh Susanna 04.mp3
- Oh Susanna 04.pdf
- Oh Susanna 04_Lyrics.pdf
- Oh Susanna 04 slow.mp3
Lesson 2
Lesson 2 uses "Cockles and Mussels" to demonstrate a pattern with 3/4 time signature.
This is just a variation on the patterns in Lesson 1.
"Gold Watch Blues" demonstrates a new pattern and also introduces the "hammer-on" technique.
Hammer-on is a technique where you pick a string, then immediately press a different fret on that string, but you don't pick it again. Listen to the mp3 file for Gold Watch blues to get the idea.
Hammer-on is a technique where you pick a string, then immediately press a different fret on that string, but you don't pick it again. Listen to the mp3 file for Gold Watch blues to get the idea.
Lesson 3
Lesson 3 shows how to create a simple introduction using "Annie's Song".
We will introduce a technique called a "pinch" using the thumb + one or more fingers in a pinching action.
The main pattern for this song has been covered in previous lessons, however this song also
demonstrates more complex left-hand techniques.
Lesson 4
Lesson 4 is the first departure from the one-finger-per-string principle we've used in previous lessons.
We're going to introduce an alternating base line, where the thumb alternately plays strings 4 and 3. The 1st and second fingers
play strings 2 and 1 respectively. Although the thumb alternates between two strings, strings 1 and 2 are both played together.
12 Bar Blues Workshop
12 Bar Blues is simply a chord pattern that repeats itself every 12 bars.
(8 bar blues and 16 bar blues likewise repeat every 8 and 16 bars respectively)
The common chord progressions in major keys usually revolve around the root chord plus the 4th and 5th chords, and often using both the major and 7th variations of all these chords
So in the key of C, we can usually expect to see the chords C, F, G, C7, F7, G7
For this workshop we will be using a chord progression in the key of A and we will use the chords A, D7, E7 and E7+5
Because we will be picking individual strings, the chords are really just convenient ideas of roughly where the fingers on your chord hand are going to need to be at any given time.
The blues makes extensive use of syncopation, which simply means playing the notes slightly off the usual or expected beat of the tune
This workshop is divided into two parts:
1: Basic, which introduces the idea of playing individual notes, and makes use of the hammer technique to add some colour
2: Intermediate which make more extensive use of the hammer technique and introduces the slide technique
There are three files for each part, an mp3 file that gives an indication of what we are heading for, a tab file which contains just the tab for the tune and a score file which contains the score along with the tab.
Singing The Blues Workshop
"Singing the Blues" is a great song for learning some blues finger style techniques.
This version of the song is built around very simple chords, so that we can focus on the fingering techniques.
Using this song, we will begin with a simple picking pattern for the whole song.
We will then add a finger style instrumental introduction, then look at a little bridging riff in the middle.
Next we can add a chord slide (glissando) in the middle of the verses and finally we will introduce an instrumental solo and see how to use a simple note bend.
By breaking the song down this way, it allows us to practice and use the different enhancements one at a time, without feeling the need to learn absolutely everything at once.
Jam Session : Practice Songs
Jam Session contains some popular songs using the different patterns we've learned to date.
A couple of the songs contain chord changes in the middle of bars,
which is good practise for keeping the picking hand going while the chord hand changes.
Other Workshops
These are not online workshops. This is just a place where people who have done the following workshops can download the course material.
Introduction
When you start playing the ukulele, you usually start with some very simple strumming patterns.
Many people go on to learn more and more complex strumming techniques including various
triplet strums. This bring a lot more interest to a tune.
Fingerstyle Ukulele takes a different path. It is neither more nor less advanced than
strumming, it is simply a different technique which allows for great colour and expression.
Indeed it is common for tunes to be played using a combination of fingerstyle and strumming.
The Fingerstyle Ukulele for Beginners is designed for Soprano, Concert, and Tenor Ukes with standard GCEA tuning. High
G or Low G string doesn't matter
Note that this is a beginners Fingerstyle class - it is NOT a beginners Uke class, and you will need to be quite familiar with the basic set of chords and the 7th and minor varieties
and feel comfortable changing chords at a reasonable speed.
This course aims to give you a good grounding in some basic fingerstyle patterns, which
you can use in many, many tunes (probably all tunes). We will look at patterns in different
time signatures and we will look a little beyond patterns to simple melodic introductions to tunes.
The Fingers and the Strings
|
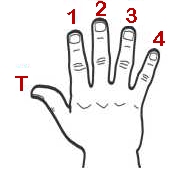
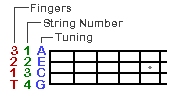
I try and talk about your "picking-hand" so that the meaning is the same whether you are left or right handed. From the diagram we'll be using the thumb T and fingers 1,2 and 3. Finger 4 isn't used in any of the lessons here. This works out well as we can allocate one finger to each string. Holding your ukulele normally, the string closest to the ground is number 1, the one closest to your head is number 4. For the strings: G = 4, C = 3, E = 2, A = 1 For the fingers: G = T, C = 1, E = 2, A = 3 For the first three lessons, this is always the fingering we'll use. It changes in lesson 4, but we don't need to worry about that for now. |
Patterns
Patterns are a great place to start your fingerstyle journey
as they help to build muscle memory, flexibility and coordination and also help to give you more ability to separate out
your left and right hands.
So what do we mean by patterns?
Well we mean some sort of sequence that repeats itself over and over. In this case it is some
sequence of the fingers of the picking hand that we play repeatedly throughout the song.
For example we might play the fingers
T, 1, 2, 3, T, 1, 2, 3, T, 1, 2, 3......
or a little more complex
T, 1, 2, 3, 2, 3, 2, 1, T, 1, 2, 3, 2, 3, 2, 1....... We usually play one complete sequence in a single bar (or measure) of the tune, with the thumb T being played on the first beat of the bar.
T, 1, 2, 3, 2, 3, 2, 1, T, 1, 2, 3, 2, 3, 2, 1....... We usually play one complete sequence in a single bar (or measure) of the tune, with the thumb T being played on the first beat of the bar.
Counting (out loud)
Counting along with the music while you are playing is great way to keep the beat consistent, helps you follow the pattern,
and gently reels you back when your fingers have lost the plot.
Important tip Counting out loud for some reason works far, far better than counting in your head!
(If you're not real sure about bars and beats, have a bit of a glance at the theory section below)
We count every whole beat in the bar as 1, 2 3, 4 etc. and we count every half beat by saying "and"
Here's a bit of "You are my Sunshine" (just ignore the " you are my" bit, we'll start counting at "Sunshine";
If you look at the tab sheet in Lesson 1 for "You Are My Sunshine", you will see that we are playing one note for each whole and each half beat in the bar.
Important tip Counting out loud for some reason works far, far better than counting in your head!
(If you're not real sure about bars and beats, have a bit of a glance at the theory section below)
We count every whole beat in the bar as 1, 2 3, 4 etc. and we count every half beat by saying "and"
Here's a bit of "You are my Sunshine" (just ignore the " you are my" bit, we'll start counting at "Sunshine";
You  are  my  sun.....shine      my  only    sun.....shine

              1  and  2  and  3  and 4  and  1  and  2  and  3  and  4
If you look at the tab sheet in Lesson 1 for "You Are My Sunshine", you will see that we are playing one note for each whole and each half beat in the bar.
Tabs
A tab is a very common layout for describing how to play a tune on a stringed instrument. Sometimes the tabs come with a corresponding score (you know - the lines and dots other stuff that looks like real music)
The tab will tell you which frets to press, and which notes to play, when to play then and with which fingers, so it's really quite a compact way to learn to play tunes - especially so for Fingerstyle playing.
The tabs in these lessons do not come with a score, but there's really no need for it.
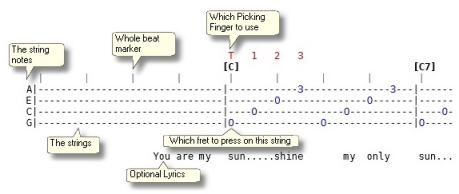
Important The numbers on the strings are the Frets to press not the fingers of your chord hand!
In the example notice the number "3" which appears twice on the "A" string. This means you hold down the 3rd fret on the "A" string
T 1 2 3 are the picking fingers and we can see that we pick one string on each half beat of the bar.
In this example we only need to specify the sequence once, since this creates the pattern we will be repeating for the whole song.
The tab will tell you which frets to press, and which notes to play, when to play then and with which fingers, so it's really quite a compact way to learn to play tunes - especially so for Fingerstyle playing.
The tabs in these lessons do not come with a score, but there's really no need for it.
Important The numbers on the strings are the Frets to press not the fingers of your chord hand!
In the example notice the number "3" which appears twice on the "A" string. This means you hold down the 3rd fret on the "A" string
T 1 2 3 are the picking fingers and we can see that we pick one string on each half beat of the bar.
In this example we only need to specify the sequence once, since this creates the pattern we will be repeating for the whole song.
A Minuscule amount of Theory (gasp! horror!)
If you really want to know about music theory, then there are some excellent websites. I'm just trying to get some
very basic ideas across which will hopefully help with some of the lessons.
You don't actually have to understand or even read the stuff here, it's just a little extra.
That said, the little bit of theory here is general music theory and applies to any instrument and any style of playing.
Bar (or Measure)
Music is broken into small units called bars (or sometimes measures). If you look at a piece of music written down, you'll notice that the horizontal lines (called a staff) are broken up by regularly occurring vertical lines. The bit between two vertical lines is called a bar.
You've probably heard the term "12 bar blues"? Well this is just a piece of music based around a sequence of 12 bars which then repeats itself.
The number of beats in a bar is usually (but not always) the same throughout the tune.
Time Signature
The time signature tells you how many beats of what type are in each bar, so 4/4 time tells us that there are 4 quarter notes in a bar and 6/8 time tells us there are 6 eighth notes in a bar.
Ah-ha! I hear you say "What's a quarter note a quarter of?". Good question.
A quarter note (called a crochet) is a quarter of (or a quarter the length in time of) a whole note (called a semibreve). An eighth note (called a quaver) is an eighth of whole note, so by some simple maths there are 2 quavers in a crochet.
A full discussion of time signatures is way, way beyond us here. What we need mostly to know is we'll be dealing mostly with quarter notes (crochets) and eighth notes (quavers) and some common time signatures;
2/4 - 2 beats in a bar - each beat a quarter note - example "Mary Had a Little Lamb"
4/4 - 4 beats in a bar - each beat a quarter note - example "My Grandfather's Clock"
3/4 - 3 beats in a bar - each beat a quarter note - example "Hey Diddle Diddle" (also called waltz time)
6/8 - 6 beats in a bar - each beat an eighth note - example "Hickory Dickory Dock" (used in Irish jigs)
(Although there are 6 quavers in a bar in 6/8 time, strictly speaking there are only 2 beats in a bar, each beat comprising a triplet (three notes). Thanks to Jenni Mersiades for pointing this out)
We'll be using tunes in mainly 4/4, 3/4 and a very little 2/4 time.
You will often get a mixture of crochets and quavers in one bar, but if you count out the whole beats as the music is playing you will find yourself counting 1,2,3,1,2,3,1,2,3 (for 3/4 time) or 1,2,3,4,1,2,3,4,1,2,3,4 (4/4 time). In other words you'll be counting the main beats of the bar no matter how many actual notes there are.
There are many very exotic time signatures which need not detain us here, except to give a couple of more common examples of tunes you might have heard;
"Mission Impossible Theme" in 5/4 time, Pink Floyd's "Money" or Peter Gabriels's "Solsbury Hill" both in 7/4 time. And for the Irish music fans the much more common 9/8 time of slip jigs.
Key Signature
This is just the key (A,B,C,D,E,F,G) that the tune is in. More often than not the first chord in a tune will be the key of the tune, but don't get caught, there are many many examples that start with a chord other than the key.
Often the last chord in a tune is the key, but again it's not always the case.
The 1-4-5 Rule
The harmonic theory behind this rule is a bit beyond us here, but it is a common recurring theme which will help you play along with a tune if you know the key, but don't have the chords.
Because of how harmonies work and how different notes "resolve" themselves the 1st, 4th and 5th chords in any key are frequently the most common chords in a tune.
Let's take the key of C, which has the notes C, D, E, F, G, A, B (then back to C for a whole octave)
If we number the notes 1 - 7, we'll find that in the key of C, the 1st, 4th and 5th notes are C, F, G respectively. So what? Well it turns out that an incredible number of songs are based around the 1st, 4th and 5th chords in a given key.
So in the key of C as we have seen, the common chords are C, F, G and in the key of G, the common chords are G, C, D (remember in the key of G, G is the 1st, so C and D are the 4th and 5th respectively).
For a lot of songs then, if you know what key they are in, you can have a fair stab at picking out the common chords.
None of this is universally true, but it's a great place to start if you want to join a jam session and you don't know all the tunes and you're going to play by ear.
The Minor Third
Related to the 1-4-5 rule, is the minor third. When a tune shifts from a major to a minor key, you will frequently find that you can guess the minor chord from the major key by counting backwards from the key note.
For example; In the key of C if we count backwards from C, we will go C, B, A. If we say that C=1, B=2, A=3 then A is the third note below C and that is likely to be one of the minor chords in the song. (Actually this is a little bit of a cheat since technically the minor third is three semitones below the key note, but for our purposes the result is the same)
If we now apply our 1-4-5 rule to the Am (assume Am is 1) then 4 and 5 will be Dm and Em respectively, which it turns out are very likely to be the other minor chords in the tune.
So in the key of C we get the major chords C, F, G and the minor chords Am, Dm, Em
In the key of G we get major chords G, C, D with minor chords Em, Am, Bm
Again this is really useful to know if you want to jam along without the music.
The Triplet
I mention triplets here in the context of a very popular (though hard to master) uke strumming technique, where we cram three notes (hence triplet) into the space where we'd usually expect to find only one note.
How to describe it? Well think of a normal 4/4 tune where for each beat we say
Dum - Dum - Dum - Dum,
then instead say
Dum, did-le-y, Dum, did-le-y.
Anyway, let's not panic about it
Arpeggio
An arpeggio is when we simply play the notes of a chord individually one after the other. A very common technique in some strumming styles it is also extensively used in Fingerstyle.
Glissando
Glissando describes the technique of sliding from one note to another. A very common technique in most stringed instruments, it applies to both strumming and finger style playing, and can be applied to a single note, or a chord.
In ukulele or guitar tabs it is usually simply called a "slide".